
Notice
Recent Posts
Recent Comments
Link
| 일 | 월 | 화 | 수 | 목 | 금 | 토 |
|---|---|---|---|---|---|---|
| 1 | 2 | 3 | 4 | |||
| 5 | 6 | 7 | 8 | 9 | 10 | 11 |
| 12 | 13 | 14 | 15 | 16 | 17 | 18 |
| 19 | 20 | 21 | 22 | 23 | 24 | 25 |
| 26 | 27 | 28 | 29 | 30 |
Tags
- c++
- 오류
- Material
- Basic
- Tutorial
- 재귀
- 파이썬
- UE5
- w3school
- 백준
- 프로그래밍
- 문제풀이
- Unreal Engine 5
- python
- String
- DP
- Class
- dynamic
- Algorithm
- 기초
- loop
- 시작해요 언리얼 2022
- github
- Unity
- Programming
- parameter
- guide
- W3Schools
- C#
- dfs
Archives
- Today
- Total
행복한 개구리
Unity 수업내용 21.07.27. RestAPI 본문
일단 웹서버와 통신을 하는 것이기 때문에 NodeJS로 웹서버를 만들자.
const express = require("express");
const app = express();
app.use(express.json());

let users = {};

app.listen(3030, ()=>
{
    console.log("3030포트에서 대기중...");
});

app.get("/", (req,res)=>
{
    res.send("Hello RESTAPI");
});

app.post("/score",(req,res)=>
{
   const {id, score} = req.body;
   users[id] = score;
   console.log(users);
   res.status(200).end();
});- users를 객체로 선언하고 users의 id키의 값을 score를 할당함으로써 JS의 딕셔너리를 사용 가능했다.
이어서 유니티에서 어떠한 요청코드를 보내면 그에 대한 응답 코드를 보내는 방식으로 작동시킬 것이다.
=> ex) 유니티에서 1000이라는 요청코드를 보내면 웹서버에서 신규/최고기록/신규도 아니고 최고기록도 아닌 요청의 분기에 따라 1001, 1002, 1003이라는 응답 코드를 반환할 것이다.
const express = require("express");
const app = express();
app.use(express.json());

let users = [];

app.listen(3030, () => {
  console.log("3030포트에서 대기중...");
});

app.get("/", (req, res) => {
  res.send("Hello RESTAPI");
});

app.post("/score", (req, res) => {
  const { id, score } = req.body;

  let result = {
    cmd: -1,
    message: "",
  };

  let user = users.find((x) => x.id == id);

  if (user === undefined) {
    //아직 등록이 한번도 안된 유저
    users.push({ id, score });
    result.cmd = 1001;
    result.message = "점수가 신규 등록되었습니다.";
  } else {
    if (score > user.score) {
      //최고점수라면 갱신
      user.score = score;

      result.cmd = 1002;
      result.message = "점수가 갱신되었습니다.";
    } else {
      result.cmd = 1003;
    }
  }
  console.log(users);
  res.send(result);
});- 하지만 딕셔너리보다는 여러 데이터를 담아야 하므로 users를 배열로 만들고 그 값을 여러가지 할당하기로 했다.
- 요청을 받으면 req의 id가 존재하는지 판단한다.
- 존재하지 않는다면 score와 id모두를 배열에 저장해주며 1001을 반환한다. => 신규등록
- 존재한다면 최고점수인지 아닌지를 분기를 나누게 되는데 최고점수라면 해당 user의 score를 새롭게 입력된 score로 변경해주고 1002를 반환한다. => 갱신
- 그것이 아니라면 1003을 반환한다 => 신규도 갱신도 아니지만 정상적으로 통신
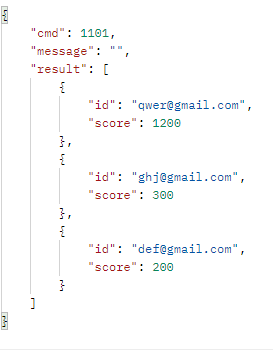
app.get("/score/top3", (req,res)=>
{
    let result = users.sort(function (a,b){
        return b.score - a.score;
    });

    result = result.slice(0,3);
    res.send({
        cmd: 1101,
        message: "",
        result
    });
});- 그리고 저장된 유저정보를 점수에 따라 정렬시키고 랭킹3위까지의 유저정보를 가져오는 식이다.
- sort를 이용하여 배열을 정렬시켜주고
- slice(a,b)를 이용하여 배열의 a인덱스 부터 b-1인덱스까지 반환해준다.
이번엔 특정 유저의 정보를 불러와보자.
app.get("/score/:id", (req, res) => {
  console.log("id: " + req.params.id);
  let user = users.find((x) => x.id == req.params.id);
  if (user === undefined) {
    res.send({
      cmd: 1101,
      message: "잘못된 ID입니다."
    });
  } else {
    res.send({
      cdm: 1102,
      message: "",
      result: user,
    });
  }
});- find를 사용하여 배열의 요소의 id와 요청한 id가 불일치한다면 1101과 함께 잘못된 아이디라는 메시지를 반환하고
- 일치한다면 1102를 반환하며 해당 유저를 반환해준다.

이제 틀은 잡혔으니 유니티와 연동해보자.
ScriptableObject - Unity 매뉴얼
ScriptableObject는 클래스 인스턴스와는 별도로 대량의 데이터를 저장하는 데 사용할 수 있는 데이터 컨테이너입니다. ScriptableObject의 주요 사용 사례 중 하나는 값의 사본이 생성되는 것을 방지하
docs.unity3d.com
네트워킹을 조금 더 편리하게 해주는 ScriptableObject를 사용할 것이다.
- 우선 스크립트를 만들고 매뉴얼에 나와있는 코드를 적어준다.
- 클래스의 내용으로는 내가 전달하고 싶은 데이터로 바꿨다.
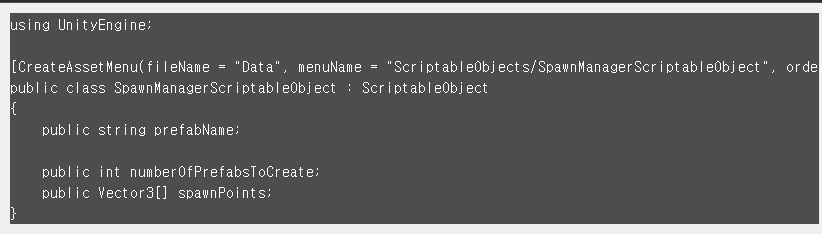
using UnityEngine;

[CreateAssetMenu(fileName = "Data", menuName = "ScriptableObjects/SpawnManagerScriptableObject", order = 1)]
public class SpawnManagerScriptableObject : ScriptableObject
{
    public string id;
    public int score;
}- 아이디와 점수를 주고받기위해 필드변수를 바꿔주었고 이대로 저장을 하고 에디터로 가보면 버튼이 생길것이다.

- 사진과 같이 Assets - ScriptableObjects - 클래스 이름 식으로 생성될것이다. 해당 ScriptableObjects를 생성해보면

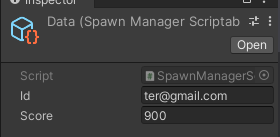
- 이렇게 Data라고 ScriptableObject가 생겨난다.
- 그리고 그 인스펙터에는 내가 필드변수로 선언한 id와 score가 존재한다.
이어서 데이터를 받을 프로토콜 형식을 스크립트에 만들어보자.
원래는 프로토콜 문서를 따라 만들어야하지만 현재는 테스트형식이어서 문서는 없고 실시간으로 진행했다.
using System.Collections;
using System.Collections.Generic;
using UnityEngine;

public class Protocols
{
    public enum eType
    {
        POST_SCORE = 1000
    }

    public class Packets
    {

        public class common
        {
            public int cmd;
        }

        public class req_scores : common
        {
            public string id;
            public int score;
        }

        public class res_scores : common
        {
            public string message;
        }

        public class user
        {
            public string id;
            public int score;
        }

        public class res_scores_top3 : res_scores
        {
            public user[] result;
        }

        public class res_scores_id : res_scores
        {
            public user result;
        }
    }
}- 그저 상속을 이용하여 데이터를 받을수 있는 형식들의 분기를 나누어 준 것이다.
- 여기서 변수의 이름은 NodeJS웹서버에서 사용한 변수의 이름과 일치해야한다.
이제 데이터를 주고받아보자.
using System.Collections;
using System.Collections.Generic;
using UnityEngine;
using UnityEngine.UI;
using Newtonsoft.Json;
using UnityEngine.Networking;
using System.Text;

public class RankMain : MonoBehaviour
{
    public string host;
    public int port;
    public string top3Uri;
    public string idUri;
    public string postUri;

    public SpawnManagerScriptableObject scriptableObject;

    public Button btnGetTop3;
    public Button btnGetId;
    public Button btnPost;

    void Start()
    {
        this.btnGetTop3.onClick.AddListener(() => {
            var url = string.Format("{0}:{1}/{2}", host, port, top3Uri);
            Debug.Log(url);

            StartCoroutine(this.GetTop3(url, (raw) =>
            {
                var res = JsonConvert.DeserializeObject<Protocols.Packets.res_scores_top3>(raw);
                Debug.LogFormat("{0}, {1}", res.cmd, res.result.Length);
                foreach(var user in res.result)
                {
                    Debug.LogFormat("{0} : {1}", user.id, user.score);
                }
            }));
        });
        this.btnGetId.onClick.AddListener(() => {
            var url = string.Format("{0}:{1}/{2}", host, port, idUri);
            StartCoroutine(this.GetId(url, (raw) => {

                var res = JsonConvert.DeserializeObject<Protocols.Packets.res_scores_id>(raw);
                Debug.LogFormat("{0}, {1}", res.result.id, res.result.score);

            }));
        });
        this.btnPost.onClick.AddListener(() => {
            var url = string.Format("{0}:{1}/{2}", host, port, postUri);
            var req = new Protocols.Packets.req_scores();
            req.cmd = 1000;
            req.id = scriptableObject.id;
            req.score = scriptableObject.score;
            var json = JsonConvert.SerializeObject(req);

            StartCoroutine(this.PostScore(url, json, (raw) =>
            {
                var message = JsonConvert.DeserializeObject<Protocols.Packets.res_scores>(raw);
                Debug.LogFormat("{0} : {1}", message.cmd, message.message);
            }));

        });
    }

    private IEnumerator GetId(string url, System.Action<string> callback)
    {
        var webRequest = UnityWebRequest.Get(url);
        yield return webRequest.SendWebRequest();
        if (webRequest.result == UnityWebRequest.Result.ConnectionError || webRequest.result == UnityWebRequest.Result.ProtocolError)
        {
            Debug.Log("네트워크 환경이 안좋아서 통신을 할수 없습니다.");
        }
        else
        {
            callback(webRequest.downloadHandler.text);
        }
    }

    IEnumerator PostScore(string url, string json, System.Action<string> callback)
    {
        var webRequest = new UnityWebRequest(url, "POST");
        var bodyRaw = Encoding.UTF8.GetBytes(json);
        webRequest.uploadHandler = new UploadHandlerRaw(bodyRaw);
        webRequest.downloadHandler = new DownloadHandlerBuffer();
        webRequest.SetRequestHeader("Content-Type", "application/json");

        yield return webRequest.SendWebRequest();

        if(webRequest.result == UnityWebRequest.Result.ConnectionError || webRequest.result == UnityWebRequest.Result.ProtocolError)
        {
            Debug.Log("네트워크 환경이 좋지 못하여 통신을 할 수 없습니다.");
        }
        else
        {
            callback(webRequest.downloadHandler.text);
        }
    }

    IEnumerator GetTop3(string url, System.Action<string> callback)
    {
        var webRequest = UnityWebRequest.Get(url);
        yield return webRequest.SendWebRequest();

        if (webRequest.result == UnityWebRequest.Result.ConnectionError || webRequest.result == UnityWebRequest.Result.ProtocolError)
        {
            Debug.Log("네트워크 환경이 좋지 못하여 통신을 할 수 없습니다.");
        }
        else
        {
            callback(webRequest.downloadHandler.text);
        }
    }
}- 모든 데이터 통신 방식은 비동기로 이루어진다
- => 데이터를 받기도 전에 결과를 출력하는 것을 방지하기 위해서
- GET과 같이 그저 받아오는 형식은 url만 필요할 뿐이다.
- 간단하게 WebRequest를 통해 Get(url)을 해주면 downloadHandler를 통해 데이터를 받아올 수 있다.
- GetTop3로 예를 들자면 downloadhandler를 통해 텍스트형식의 데이터를 받아왔고 이를 콜백의 매개변수로 할당한다.
- 이 텍스트형식의 데이터를 역직렬화한 뒤 cmd와 message는 출력해주고 user들의 정보가 들어있는 result는 foreach문을 통해 각각의 user정보를 얻어낸다.
- 간단하게 WebRequest를 통해 Get(url)을 해주면 downloadHandler를 통해 데이터를 받아올 수 있다.

- Post형식은 우리가 형식에 맞게 데이터를 전송해주어야 한다.
- 여기서 ScriptableObject가 쓰이는데, 요청의 내용을 해당 오브젝트를 통해 기입할 수 있다.

- 우선 요청 데이터형식으로 선언해주고 해당 형식의 id와 score는 scriptableObject에서 가져와 할당해준다.
- 이를 직렬화 하여 Post하는 방식인데, 여기서 주의할 점은 Header타입을 지정해주어야 한다는 점과
- 해당 JSON형식의 데이터를 Byte형식으로 바꾸어주어야한다는 점이다.
- 따라서 System.Text네임스페이스의 Encoding.UTF8.GetBytes를 통해 Json을 Byte[]로 만들어주고 이를 uploadHandler를 통해 전달한다.
- 그리고 SetRequestHeader를 통해 헤더타입도 지정해준다.

- 이후로는 Get형식과 같다.


'Unity > 수업내용' 카테고리의 다른 글
| Unity VR 수업내용 21.08.05. 360VR (0) | 2021.08.05 |
|---|---|
| Unity VR 수업내용 21.08.04. Cardboard VR (0) | 2021.08.04 |
| Unity 수업내용 21.07.26. Asset Bundle (0) | 2021.07.26 |
| Unity 수업내용 21.07.15. Shader - CubeMap (0) | 2021.07.15 |
| Unity 수업내용 21.07.15. Shader 기초 - Bump, Rim, Hologram (0) | 2021.07.15 |
'Unity/수업내용' Related Articles
more


