
Notice
Recent Posts
Recent Comments
Link
| 일 | 월 | 화 | 수 | 목 | 금 | 토 |
|---|---|---|---|---|---|---|
| 1 | 2 | |||||
| 3 | 4 | 5 | 6 | 7 | 8 | 9 |
| 10 | 11 | 12 | 13 | 14 | 15 | 16 |
| 17 | 18 | 19 | 20 | 21 | 22 | 23 |
| 24 | 25 | 26 | 27 | 28 | 29 | 30 |
| 31 |
Tags
- loop
- Algorithm
- 재귀
- DP
- python
- Unreal Engine 5
- W3Schools
- UE5
- Basic
- 문제풀이
- Tutorial
- Class
- 시작해요 언리얼 2022
- c++
- 기초
- guide
- Unity
- 오류
- C#
- dynamic
- 프로그래밍
- dfs
- Material
- Programming
- String
- github
- 백준
- parameter
- 파이썬
- w3school
Archives
- Today
- Total
행복한 개구리
Unity 수업내용 21.07.15. Shader - CubeMap 본문

CubeMap과 게임오브젝트로는 해당 어셋들을 사용하였다.(좀비는 머리만 떼서 사용했음)
머리만 뗄 때는 뼈대를 지우지 말아야한다.
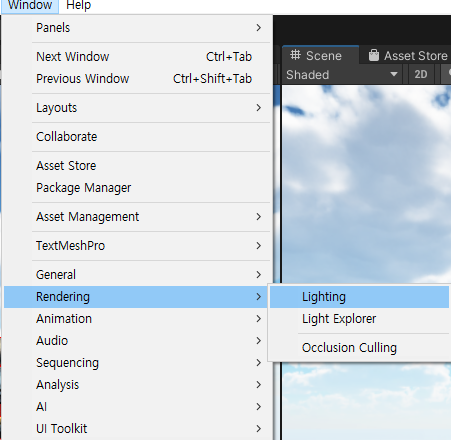
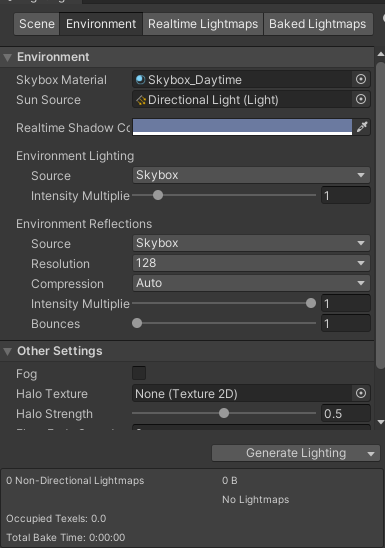
- Window - Rendering - Lighting - Environment의 Skybox Material을 원하는 배경 머티리얼로 바꿔주자.
Shader "Custom/Zombie_Cube"
{
    Properties
    {
        _MainTex ("Albedo (RGB)", 2D) = "white" {}
    }
    SubShader
    {
        Tags { "RenderType"="Opaque" }

        CGPROGRAM

        #pragma surface surf Lambert

        sampler2D _MainTex;

        struct Input
        {
            float2 uv_MainTex;
        };

        void surf (Input IN, inout SurfaceOutput o)
        {

            fixed4 c = tex2D (_MainTex, IN.uv_MainTex);
            o.Albedo = c.rgb;
            o.Alpha = c.a;
        }
        ENDCG
    }
    FallBack "Diffuse"
}- Material과 Shader를 하나씩 만들어 준 뒤 Shader를 Material에 적용시키고 Material을 해당 게임오브젝트에 할당해준다.
- 다음과 같은 효과가 나올것이다.
Shader "Custom/Zombie_Cube"
{
	Properties
	{
		_MainTex("Albedo (RGB)", 2D) = "white" {}
		_Cube("CubeMap", CUBE) = "cube"
	}
		SubShader
	{
		Tags { "RenderType" = "Opaque" }

		CGPROGRAM

		#pragma surface surf Lambert

		samplerCUBE _Cube;
		sampler2D _MainTex;

		struct Input
		{
			float2 uv_MainTex;
			float3 worldRefl;
		};

		void surf(Input IN, inout SurfaceOutput o)
		{
			fixed4 c = tex2D(_MainTex, IN.uv_MainTex);
			float4 re = texCUBE(_Cube, IN.worldRefl);
			o.Emission = re.rgb;
			o.Alpha = c.a;
		}
		ENDCG
	}
		FallBack "Diffuse"
}- CubeMap을 적용해보자.
- 램버트 라이트를 사용했다.
- 반사되는 효과를 주기 위해서는 Input에서 worldRefl이라는 월드 반사값을 사용할 수 있도록 선언해주어야 한다.
- tex2D처럼 큐브맵은 texCUBE라는 함수가 있다.
- 구해진 값을 Emission으로 적용시켜보자.
- * 주의 프로퍼티의 CUBE타입, samplerCUBE의 CUBE, texCUBE의 CUBE는 모두 대문자로 작성해야한다.
이제 질감표현을 위해 BumpTexture를 적용해보자.
Shader "Custom/Zombie_Cube"
{
	Properties
	{
		_MainTex("Albedo (RGB)", 2D) = "white" {}
		_Cube("CubeMap", CUBE) = "cube" {}
		_BumpTex("BumpTexture", 2D) = "bump" {}
	}
		SubShader
	{
		Tags { "RenderType" = "Opaque" }

		CGPROGRAM

		#pragma surface surf Lambert

		samplerCUBE _Cube;
		sampler2D _MainTex;
		sampler2D _BumpTex;

		struct Input
		{
			float2 uv_MainTex;
			float2 uv_BumpTex;
			float3 worldRefl;
			INTERNAL_DATA
		};

		void surf(Input IN, inout SurfaceOutput o)
		{
			o.Normal = UnpackNormal(tex2D(_BumpTex, IN.uv_BumpTex));
			fixed4 c = tex2D(_MainTex, IN.uv_MainTex);
			float4 re = texCUBE(_Cube, WorldReflectionVector(IN, o.Normal));

			o.Albedo = c.rgb * 0.5f;
			o.Emission = re.rgb * 0.5f;
			o.Alpha = c.a;
		}
		ENDCG
	}
		FallBack "Diffuse"
}- 월드반사값을 이용하는 Normal값은 INTERNAL_DATA를 사용해야만 적용할 수 있다. 안하면 오류난다.
- 그리고 BumpTexture를 적용해 준다.
- 이 BumpTexture에 따라 빛효과가 알맞게 반사되게 하려면 WorldReflectionVector함수를 이용해야한다.
- INTERNAL_DATA를 선언해야 하는 이유는 WorldReflectionVector함수를 이용하기 때문이다.
- Albedo와 Emission은 하나에만 선언해도 무관하다.
Wrapped Diffuse를 사용해보자.
마찬가지로 Material, Shader를 생성한 뒤 Shader를 Material에 할당하고 해당 Material을 적용시킬 게임오브젝트에 할당한다.
텍스쳐를 받을 코드를 남겨둔 뒤 필요없는 코드는 모두 지운다.
Shader "Custom/Zombie_Wrap"
{
    Properties
    {
        _MainTex ("Albedo (RGB)", 2D) = "white" {}
        _RampTex("RampTexture", 2D) = "ramp" {}
    }
        SubShader
    {
        Tags { "RenderType" = "Opaque" }
        LOD 200

        CGPROGRAM

        #pragma surface surf _Wrap noambient

        sampler2D _RampTex;
        sampler2D _MainTex;

        struct Input
        {
            float2 uv_MainTex;
        }

        void surf (Input IN, inout SurfaceOutput o)
        {
            fixed4 c = tex2D (_MainTex, IN.uv_MainTex);
            o.Albedo = c.rgb;
            o.Alpha = c.a;
        }

        float4 Lighting_Wrap(SurfaceOutput s, float3 lightDir, float atten)
        {
            float ndotl = dot(s.Normal, lightDir) * 0.5f + 0.5f;
            float4 ramp = tex2D(_RampTex, float2(ndotl, 0.5f));
            return ramp;
        }
        ENDCG
    }
    FallBack "Diffuse"
}- 이어서 Ramp Texture를 받을 프로퍼티를 만들어주고
- 커스텀 라이트를 만들어 해당 커스텀라이트로 Ramp Texture를 적용시켜보자.
- Rim때와 마찬가지로 ndotl을 사용하며, 빛의 각도에 따라 달라지므로 lightDir을 사용한다.
- 하프램버트를 사용해보자. "ndolt * 0.5 + 0.5"이다.

- Wrapped Diffuse Image를 구글링하면 사용할 텍스쳐가 나올것이다.
- 사진윗쪽에 가느다란 흰색 여백이 존재하게 하는것을 추천한다.
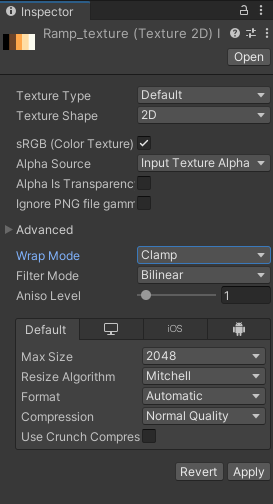
- 그리고 Ramp Texture의 Wrap Mode를 Clamp로 설정한다.
이제 BumpTexture를 적용해보자.
Shader "Custom/Zombie_Wrap"
{
    Properties
    {
        _MainTex ("Albedo (RGB)", 2D) = "white" {}
        _RampTex("RampTexture", 2D) = "ramp" {}
        _BumpTex("BumpTexture", 2D) = "bump" {}
    }
        SubShader
    {
        Tags { "RenderType" = "Opaque" }
        LOD 200

        CGPROGRAM

        #pragma surface surf _Wrap noambient

        sampler2D _BumpTex;
        sampler2D _RampTex;
        sampler2D _MainTex;

        struct Input
        {
            float2 uv_MainTex;
            float2 uv_BumpTex;
        };

        void surf (Input IN, inout SurfaceOutput o)
        {
            fixed4 c = tex2D (_MainTex, IN.uv_MainTex);
            o.Normal = UnpackNormal(tex2D(_BumpTex, IN.uv_BumpTex));
            o.Albedo = c.rgb;
            o.Alpha = c.a;
        }

        float4 Lighting_Wrap(SurfaceOutput s, float3 lightDir, float atten)
        {
            float ndotl = dot(s.Normal, lightDir) * 0.5f + 0.5f;
            float4 ramp = tex2D(_RampTex, float2(ndotl, 0.5f));

            float4 result;
            result.rgb = s.Albedo.rgb * ramp.rgb;
            result.a = s.Alpha;
            return result;
        }
        ENDCG
    }
    FallBack "Diffuse"
}- 프로퍼티로 Bump Texture를 받을 공간을 만들어준 뒤, surf에서 해당 Bump를 적용시킨다.
- 그리고 커스텀 라이트를 통해 ramp를 알맞게 결합해준다.
짤처럼 빛의 방향에 따라 RampTexture가 반응하는 것을 확인할 수 있다.
'Unity > 수업내용' 카테고리의 다른 글
| Unity 수업내용 21.07.27. RestAPI (0) | 2021.07.27 |
|---|---|
| Unity 수업내용 21.07.26. Asset Bundle (0) | 2021.07.26 |
| Unity 수업내용 21.07.15. Shader 기초 - Bump, Rim, Hologram (0) | 2021.07.15 |
| Unity 수업내용 21.07.07. 밸런싱 - 지수 함수 관계와 Triangular 관계 (0) | 2021.07.07 |
| Unity 수업내용 21.07.07. 게임 밸런싱 (0) | 2021.07.07 |
'Unity/수업내용' Related Articles
more


